Tuesday, November 30, 2010

What are the benefits of an iPad over a netbook or an iPhone?

Comparison between the iPad and iPod Touch's Keyboard.
The keyboard on the iPad is nice but can be a bit awkward due
to the size of the iPad.

Comparison between the iPad and iPod Touch's K...Image via Wikipedia

Source: makeuseof.com

What are the benefits of an iPad over a netbook or an iPhone?

Cassandra G asks:


I’m not being facetious, but what exactly is the point of the iPad? Why not get a netbook or an iPhone?

My partner wants an iPad and *I* want justification for spending this amount of money!

Many thanks.


Ceatif Diva 4 days ago


It appears from the comments to your question those who do not have an iPad have little good to say about then. But those who own one and have taken the time to learn what they can do, wouldn't be without them. I had a PC laptop and it never met my expectations, my iPad has exceeded them.


nancy 6 days ago


As far as iPad vs. Netbook is concerned - I own both. I bought my netbook about a year ago and have used it maybe two or three times at most - and got quite frustrated while using it. I got the iPad about a month ago and I've used it on a daily basis. Some people might say that they need a physical keyboard but honestly most netbook's keyboards are a lot more difficult to use than the iPad's onscreen keyboard. Other than that, it's such a sleek device and there's no end to how you can use it because of the variety of apps that are available.

Put the iPad together with the camera connection kit and you'll never have to travel with a laptop again imho.

Compared to the iPhone is another story - it really depends on what your needs are. With the iPad itself there's the choice of 3G or WiFi.

And then in comparison it to the iPhone - do you want a camera? Do you want to use it to listen to music in your car? If that's the case - go for the iPhone instead. But if you want to watch movies, play games, send emails, read ebooks and even blog (to a certain extent) - go for the iPad. You don't have to convert .avi files if you use a free app like VLC, you can watch flash videos using the paid app Skyfire, and there is multitasking with the new OS that was just released.

I'm a huge fan of the iPad - despite the fact that my first impression of it was that it was just an oversized iPod Touch. Your partner is going for the good stuff!


Saikat Basu - 1 week ago


Well, firstly the iPad is the beauty to the Netbook's beast.

Secondly, the iPad (and iPhone) is more of a multimedia device that's great for video, web browsing, or social networking with email.

The Netbook on the other hand is more functional. It's just like a laptop only smaller. You can video char, type in long documents and work with lighter apps that don't strain the CPU too much (serious graphic software would be a no-no).

From what I have hear, it's more difficult to type on iPad's on-screen touch keyboard than it is on a netbook.

You cannot really compare these three on a one-to-one basis.Your choice will boil down to what you ultimately plan to do on any of these devices.


Mike said 1Week ago

Well as for the iPhone most common reasons are the price, the screen size and simply that it's a mobile phone.

The iPhone 4 will cost you more money than the iPad WiFi.
- iPhone 4 32GB with contract ~299$ + smallest package ~15$ * 24 Months = ~659$
- iPhone 4 32GB without contract ~700$
- iPad WiFi 32GB ~600$
The screen size of the iPad makes a lot of things more comfortable ~ movies, eBooks/pdfs and webpages (there are lot of webpages not optimized for mobile devices)... for example a friend of mine is using it for reading newspapers and as a cookbook in the kitchen, two things where the iPhones' screen size will hit it's limits regarding usability.

As for netbooks there is probably lot of room for discussion.
My personal points would be:
~ Touchscreen
easier and more comfortable to use than keyboard and trackpad
imagine holding your netbook with one hand, and type with the other *no-fun*

~ Screen size
while all Apps are made for iPhone/iPad screens most Software is not for Netbooks
if you ever run Outlook or Excel on a Netbook you will know what I mean

~ ease of use
A Netbook basically is a mobile PC with "low end hardware". You don't have to be a rocket scientist but sooner or later you will run into the same Windows/Linux challenges and problems.
Solving those without losing data and settings is the same pain as on a PC. For an iPad it's like 2 clicks ~ restore to factory defaults, restore backup which is automatically created by iTunes.

~ Security, Malware and compatibility
On an iPad you don't really have to worry about that (except for it being stolen, which is the same for all and any devices). Apple does all the testing and stuff before Apps get into the App Store.

I did buy a netbook about a year ago and all I have done so far is testing out a few Linux distros... it's small and bulky, the power adapter is huge and when leaving the optical drive at home I could also leave the whole thing because my iPhone (or for that matter an iPad) can do the very same things.


Read more of this discussion at makeuseof.com/answers
Enhanced by Zemanta

Thursday, November 25, 2010

Sparrow for Gmail 1.0b5 Review

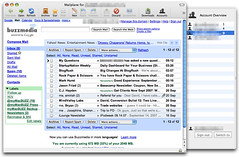
MailplaneImage by blogjunkie via Flickr

Source: Macworld


Promising Prospect: Sparrow for Gmail

Sparrow for Gmail 1.0b5 Review

By Dan Frakes, Macworld.com - November 17, 2010

One of the drawbacks of Google’s Gmail e-mail service is that the Website’s interface lacks some of the nice features of a dedicated e-mail client. For example, clicking an e-mail link in a Web page or a document doesn’t open a new Gmail message window, and you can’t drag a document to an icon in the Dock to attach the file to a new message. You can configure an e-mail client such as OS X’s Mail to access your Gmail account via IMAP, but Gmail’s approach to message organization doesn’t always work well with an IMAP e-mail client—plus you lose out on some of Gmail’s popular features, such as labels.

An alternative is an e-mail client specifically made for Gmail. I previously covered Mailplane, which takes a Web-page view of Gmail and wraps it in an application shell. The benefit of Mailplane is that, within Mailplane’s window, Gmail still looks like Gmail—if you like the way the Gmail Website works, Mailplane preserves that interface.

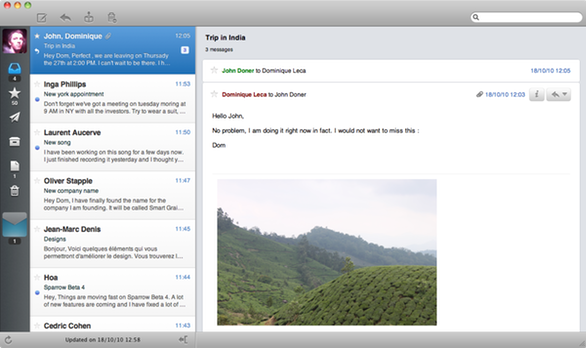
If, on the other hand, you prefer the features and interface of a traditional e-mail client, a promising alternative is Sparrow, a Gmail client currently in beta. At first glance, Sparrow looks a lot like Tweetie for Mac, with your account icon on the left, and below it icons for your Inbox, Starred mail, Sent mail, labels, Drafts, and Trash. If you’ve got multiple Gmail accounts configured, each account’s icon appears in the list; clicking an account icon “expands” that account—again, Tweetie-style—to display the icons for that account’s various views, while collapsing other accounts.

(Image courtesy of sparrowmailapp.com)

Click any view’s icon to display a list of corresponding message to the right. Double-click a message to view it in a separate window, or, if you’ve chosen to show Sparrow’s preview pane, simply select a message to display it to the right of the message list.

You work with messages much as you would in Mail. Sparrow even uses OS X’s Address Book, auto-filling contacts as you type them into the recipient fields of messages. But unlike Mail, Sparrow supports Gmail-specific features such as labeling, archiving, and starring messages. You can also set up aliases so, for example, you can use a different From address than your primary Gmail e-mail address, and you can view message conversations in an interface that looks more like Gmail than Mail. The program also provides audible and Growl alerts when new mail arrives.

As I mentioned, Sparrow is currently in beta, and it shows: In testing the current pre-release version, I regularly had to quit and relaunch the program to get it to load new messages; the preview pane didn’t always show attachments; and resizing the main window occasionally resulted in onscreen artifacts. But I’m looking forward to updates, as Sparrow has lots of potential for fans of Gmail.

Enhanced by Zemanta

Tuesday, November 16, 2010

In-ear-canal headphone primer

A pair of universal fit in-ear monitors. This ...Image via Wikipedia

Source: Macworld

What you need to know about in-ear-canal headphones (a.k.a., “canalphones”)
by Dan Frakes, Playlist Magazine
As more and more people own iPods, Zens, and Zunes, and use those players in noisy environments, in-ear-canal headphones - commonly known as "canalphones" or "in-ear monitors" - have become increasingly popular. As a high-quality option for replacing the cheap headphones included with portable music and media players, the selection of canalphones has, over the past decade, evolved from a few expensive models to a wide-open market with dozens of choices across a wide price range.
Still, it’s fair to say that most people aren’t familiar with in-ear-canal headphones, which differ considerably from traditional headphones in terms of fit, sound quality, and use. We’ve put together this primer to help you understand what makes canalphones unique and why you may (or may not) want to give them a try.
As more and more people own iPods, Zens, and Zunes, and use those players in noisy environments, in-ear-canal headphones---commonly known as "canalphones" or "in-ear monitors"---have become increasingly popular.
As a high-quality option for replacing the cheap headphones included with portable music and media players, the selection of canalphones has, over the past decade, evolved from a few expensive models to a wide-open market with dozens of choices across a wide price range.
Still, it's fair to say that most people aren't familiar with in-ear-canal headphones, which differ considerably from traditional headphones in terms of fit, sound quality, and use.
We've put together this primer to help you understand what makes canalphones unique and why you may (or may not) want to give them a try.
Unlike standard headphones, which use relatively large drivers (speakers) and fit on top of or around your ears, or earbuds, which use fairly small drivers and sit loosely in your outer ears, in-ear-canal headphones use very small drivers and actually fit inside your ear canals (thus the name canalphones).
In fact, using either rubber eartips in various sizes, or foam eartips that expand to fit any size ear canal, canalphones are designed to seal your ear canals closed, blocking external noise---much like a pair of earplugs.
In fact, many canalphones look and fit just like earplugs.
Some of the companies that sell true in-ear-canal headphones include Altec Lansing, Etymotic, Future Sonics, Shure, Ultimate Ears, and XtremeMac.
What are the advantages of in-ear-canal headphones over other styles?
Another is that because they block so much external noise, when listening in noisy environments, you can listen to music at lower levels than with most other types of headphones.
Finally, because of the technology used and the way canalphones seal in your ear canals, they have the potential to produce very good audio quality---some in-ear-canal headphones are among the best headphones on the market, period.
Finally, most in-ear-canal headphones suffer---to varying degrees---from microphonics, a phenomenon where, because the headphones seal so tightly against your ear canals, bumps and scrapes to the headphone cables are transferred up the cables directly to your ears.
(Manufacturers have tried to reduce microphonics by using different cable materials and by using designs that reduce cable movement; for example, Ultimate Ears and Shure use over-the-ear cable designs.)
And, of course, as with most audio products, sound quality varies between models---in general, the more you spend, the better overall sound you'll get.
But there are also variations between models at similar prices, and some relatively inexpensive models hold their own against pricier products.
Some vendors, such as Shure and Ultimate Ears, also include no-flange rubber tips in several sizes.
You try out all the various tips to find the one that offers the best seal and the best comfort.
Available from some canalphone vendors directly, or as after-market accessories from third-party vendors, custom earpieces replace the stock rubber or foam eartips with versions that fit your individual ears perfectly.
Over the past few years, an increasingly popular variant of in-ear-canal headphones has been what we call canalbuds.
We've got a good number of the latest and greatest canalphones in the queue for review, so be sure to keep an eye on Playlist and check out the Playlist Product Guide for the latest reviews.
Enhanced by Zemanta

Wednesday, November 10, 2010

OS X 10.6: Run old screen savers on Snow Leopard

Mac OS X Snow Leopard LogoImage by Dekuwa via Flickr

OS X 10.6: Run old screen savers on Snow Leopard

With Snow Leopard the ScreenSaverEngine application is a 32/64-bit binary, and if your system supports it will run in 64-bit mode. This means that any screen savers without 64-bit code will not run, and this is primarily old unsupported screen savers.
To get screen savers with only 32-bit code in them to run ScreenSaverEngine must be forced to run in 32-bit mode only.
One way to accomplish this it to remove the 64-bit portion completely:
First backup the ScreenSaverEngine app to somewhere safe, it's located at:
/System/Library/Frameworks/ScreenSaver.framework/Resources/
Then run this command from a terminal under an account with Admin rights:

sudo lipo -remove x86_64 /System/Library/Frameworks/ScreenSaver.framework/Resources/ScreenSaverEngine.app/Contents/MacOS/ScreenSaverEngine -output /System/Library/Frameworks/ScreenSaver.framework/Resources/ScreenSaverEngine.app/Contents/MacOS/ScreenSaverEngine
Removing the 64-bit portion of the ScreenSaverEngine has no apparent disadvantages; it runs fine by opening it from the Finder, having the screen saver activate on a timer, through a hot corner, etc.
One issue that will occur is that System Preferences will still run in 64-bit mode, and so will not allow you to select a screen saver that only includes 32-bit code. Handling this is much simpler:
Open the /Applications folder in the Finder.
Then Get Info (Cmd+I) on System Preferences.
System PreferencesImage via Wikipedia

Tick the Open in 32-bit mode tick box.
Opening System Preferences should give you a window titled 'System Preferences (32-bit).' Now you should be able to select the screen saver from the list.

[crarko adds: I haven't tested this one.]


Source: macworld.com
Nov 05, '10 07:30:00AM

Contributed by: melby.ruarus


Disclaimer: If you choose to use this tip you do so at your own risk, no liability is accepted.

Enhanced by Zemanta

Tuesday, November 9, 2010

Firefox 3.5 Web Browser Review

Mozilla Firefox IconImage via Wikipedia

Firefox 3.5 Web Browser Review


Source: macworld.com


Pros

  • Easy to use
  • Impressively extensible
  • Superb, thoughtful privacy features

Cons

  • Not a huge improvement on its predecessor
  • Speed boost claims don’t tell the whole story


After the great leap forward in speed, design, and overall polish that Mozilla's open source Firefox Web browser enjoyed in version 3.0 (), it's probably understandable that version 3.5 represents a more modest advancement.

While it doesn't stand out dramatically from its predecessor, the new version does bring Firefox closer to the cutting edge of Web standards, and offers a handful of clever innovations in privacy that its rivals would do well to steal for themselves.
But the browser's much-ballyhooed claims of a big speed boost aren't all they're cracked up to be.

Benchmarking the beast

On its Web site, Mozilla touts version 3.5 as "the fastest Firefox ever." But that claim refers solely to its new TraceMonkey JavaScript engine, which handles many of the Web's interactive elements, but not the fundamental rendering of HTML code.


Its assertion that Firefox 3.5 is more than twice as fast as its predecessor here is true - but Mozilla doesn't elaborate on how the new version compares to rivals.
And while its JavaScript performance has definitely improved from 3.0, Firefox 3.5's speed in other areas actually seems to have decreased.
Mozilla bases its speed-boost claims on results from the SunSpider JavaScript Benchmark.
My own SunSpider tests, on a 2GHZ aluminum MacBook with 2GB of RAM, roughly matched Mozilla's results.
Firefox 3.0.10 completed the test in 3,645.8 milliseconds, while Firefox 3.5 roared past it in 1,464.4 milliseconds.
But Mozilla understandably does not mention that Apple's rival Safari 4 () browser could soundly thump both of them in the same test, clocking in at 756.4 milliseconds - nearly twice as fast as Firefox 3.5.
Safari 4 also bested Firefox 3.5 in the XHTML and CSS rendering tests I ran - but surprisingly, so did Firefox 3.0.
Firefox 3.5 displayed a local copy of the XHTML test file in 2.66 seconds, compared to 2.55 seconds for Firefox 3.0 and 0.49 seconds for Safari 4.


In CSS rendering, Firefox 3.5 took 361 milliseconds to complete the same locally hosted test that took Firefox 3.0 355 milliseconds, and Safari 4 just 35 milliseconds.
However, Firefox 3.5 fared much better than its predecessor in Web standards compliance. (Safari 4 got perfect scores on both tests.)
Despite these test results, it's important to note that Firefox 3.5 never felt sluggish in normal use. In my tests, it rendered Web pages quickly, displayed code that thwarted earlier browsers without a hiccup, and seemed just as nimble and responsive as Safari 4.


The Forget About This Site feature lets you trim entire sites from your browser's history - although the version we tested sometimes wasn't forgetful enough.

The latest tech

Firefox 3.5, like Safari 4, includes support for the latest additions to the still-developing HTML 5 markup language, including the ability to play video and audio files without any special plug-ins.

Unfortunately, Apple and Mozilla each support only one of the two video formats HTML 5 embraces.

Apple prefers its homegrown H.264 codec, while Mozilla advocates the open-source Ogg Theora standard.

Mozilla 3.5 does a great job playing Ogg Theora files, but chokes on YouTube's HTML 5 test page and its H.264-based clip.

Other HTML 5 features, including support for the canvas element (used to draw graphics using scripting), worked perfectly in Firefox 3.5, and it handled example pages of the emerging JSON (JavaScript Object Notation) data format just fine.

Firefox 3.5, like Safari 4, also supports the ability to display downloadable fonts, but this feature's not yet in common use on the Web.  In addition, Firefox 3.5 boasts support for location-aware browsing, a new feature that may strike some users as incredibly cool, and others as creepily Orwellian.

Sites that employ location-aware browsing can use data about the network to which you're connected to plot your geographic position - for example, to automatically bring up a list of all the restaurants within three blocks of your computer.  Privacy buffs will be glad to know that this feature's strictly opt-in.


Firefox 3.5 clearly warns you when a site wants to learn your location, and it lets you grant sites access on a case-by-case basis.


Besides, for now the feature seems to exist only on a handful of test pages, in which it's used only to display your current location on a map.

Protecting privacy

Firefox 3.5 does more than any previous version of the browser to keep your surfing safe from prying eyes.

Mozilla has finally implemented its own version of Safari's "Private Browsing" feature, which works as advertised; once in private mode, you can surf to all the sites you like, and leave no trace behind in your history.

I also noticed one particularly big improvement in Firefox's ability to automatically erase your private data when you quit the program: It no longer pops up an aggravating dialogue box to get your permission every time.

Instead, you can set which parts of the browser you want wiped within the Preferences menu, and never worry about it again.


Another savvy addition proves better in theory than in practice.

While browsing your history, you can right-click any site and select "Forget This Site," to remove all traces of it from your browser - with one catch. Firefox deletes pages from a site based on the exact domain name.

So if you initially surf to "google.com," and subsequent links from that page take you to "www.google.com," selecting "Forget About This Site" on one of the "www.google.com" pages won't remove the "google.com" one.

Mike Beltzner, director of Firefox development, said the programmers were "erring on the side of caution," since different subdomains could represent entirely different sites. However, he said refinements to this feature are under consideration for future releases.

All the old favorites

Look, Ma, no plug-ins! Firefox 3.5 supports HTML 5’s ability to play videos in the open-source Ogg Theora format without a plug-in.

Firefox 3.5 supports HTML 5's ability to play videos in the open-source Ogg Theora format without a plug-in. The numerous features that set Firefox apart from its peers haven't gone anywhere in version 3.5.

The browser still works with an army's worth of user-created add-ons, which handily do everything from debugging JavaScript to blocking suspicious scripts to letting you update your blogs or listen to Web radio while you surf.

Tabbed browsing gets an extra layer of polish in Firefox 3.5. You can not only drag and drop tabs to reorganize them within a given window, but also drag a tab out of an existing window to automatically create a new window of its own.

Firefox's ability to remember your tabs even after you've quit the browser hasn't gotten any less handy, and its Recently Closed Tabs option in the History menu remains ideal for those moments when you accidentally hit the wrong button or keystroke.

What Mozilla dubs the "Awesome Bar" continues to live up to its name, pulling useful suggestions from your history, user-created tags, and bookmarks as you type a URL.

Users of Apple's newer laptops will also enjoy Firefox 3.5's full support for gestural controls, including swiping to move back and forward and pinching to zoom in and out.

And if you've got a burning need to surf the Web in any language from Amharic to Zulu, Firefox 3.5 and its 70-plus native language options now have you covered.
(Unlike Safari, whose multilingual support bloats the application's size to 80MB, Firefox 3.5 crams all this fluency, and all its other features, into a relatively svelte 50MB.)


If you have the need for speed above all else, Firefox 3.5 can't hold a candle to Safari's raw power. But for most users, the difference will be negligible.

Firefox has evolved into a beautiful, polished program that's a pleasure to use. When it comes to customization and flexibility, it's light-years beyond any other browser on the market.


Nathan Alderman is a location-aware writer and copy editor in Alexandria, Va.

Google's Chrome passes Safari in U.S. browser share


Google WebM video format: Future of HTML5 video?

Concepts:

Firefox, browser, Mozilla, Mac, reviews, Safari, features, privacy, video, Macworld, HDTV, Compare, plug-ins, support, HTML.


Enhanced by Zemanta

Monday, November 1, 2010

TorchFS - An Improvement on Spotlight

Spotlight (software)Image via Wikipedia

by Dan Frakes, Macworld.com


Source: www.macworld.com


Spotlight is one of Mac OS X's best - and worst - features.
When it works, it's an amazing tool for finding exactly the bit of data you're looking for.

But many people have complaints about its limitations.

One of those limitations is Spotlight's search-results window, which doesn't make it easy to, for example, add additional columns to view more information about found files.

But one of my biggest complaints about the results window is its lack of context.

Rather than dump all my files into my Documents folder, I keep those files fairly organized, with a clear system of hierarchical folders and subfolders.

Yet when I perform a Spotlight search, I see a huge list of files...as if I had simply dumped everything into one big folder.

(If you want to know where a particular file is located, you must select it and then look at the path displayed at the bottom of the window. And you must do this separately for each file.)

TorchFS is a program that displays Spotlight search results using your folder structure.

Or, to look at it another way, it filters your existing files and folders, displaying only those containing results of a Spotlight search.

(TorchFS requires MacFUSE, a system add-on that, in the developer's terms, "makes it possible to implement a fully functional file system in a user-space program on Mac OS X."In plain english, this means that once you've installed MacFUSE, you can add system-level support for new filesystems within your user account by simply running an application. In TorchFS's case, that filesystem is based on SpotlightFS, a virtual filesystem for Spotlight search results. You'll need to download and install MacFUSE before using TorchFS. MacFUSE is also used by ExpanDrive, a previous Mac Gem.)

I was looking for a few Macworld-related documents I created in August of 2009.

When I performed a standard Spotlight search, I ended up with a results window containing a continuous list of 1,714 item, including photos, application-support files, and lots of other cruft that had nothing to do with my Macworld writing.

Even when I sorted the list by type, it was a hassle to find the particular files I was searching for.

Using TorchFS, the results of that same search were presented as a Finder window open to my Home folder, but displaying only those folders that included search results.

I was able to navigate directly to the Macworld folder inside my Documents folder and see only those folders containing documents created in August 2009.

(One limitation of TorchFS is that the current version searches only your Home folder - you can't force it to search your entire hard drive, additional drives, or network drives.)

Also unlike Spotlight's default results window, you can change the Finder-window view of the TorchFS results window, so you can browse those results using icons, a list, columns, or Cover Flow.
TorchFS's Spotlight-results window for a search for PDF documents

I find TorchFS's approach to be much more intuitive than scanning a huge list of results.

By organizing Spotlight-search results using my folder-organization scheme, I'm able to find what I'm looking for much more quickly.

Unfortunately, TorchFS, currently at beta version 0.2, isn't without a few hassles of its own.

One is that because TorchFS uses a virtual filesystem, it requires you to save your Spotlight search as a smart folder and then access that smart folder through a virtual TorchFS "drive" that appears, depending on your Finder settings, on the Desktop, in Finder-window sidebars, and in the Finder's Computer view.

(Any smart folders you've created appear here. TorchFS automatically creates a few smart folders for finding, for example, all documents or all images.)

This makes Torch FS most useful for searches you perform repeatedly, or for the occasional search with an especially messy results list.

Another minor issue is that because of the way the underlying MacFUSE software works, you'll occasionally see a file named "Please wait" inside a folder when browsing search results.

Finally, while TorchFS worked great on a 2009 MacBook and a 2010 Mac mini in my testing, I couldn't get the underlying MacFUSE software to work properly on my 2010 iMac - which meant that TorchFS wouldn't work, either.

(All three computers were running the latest version of Snow Leopard.)

I'm looking forward to future updates to TorchFS, as I'm hooked on its approach to presenting Spotlight search results.


Concepts:


Mac, TorchFS, folder, Spotlight, window, Macworld, app, photo, Prices, Mac Gems, accessories, MacFUSE, smart folders, business, drives.


Enhanced by Zemanta

Saturday, October 30, 2010

PowerTunes 1.1.3 - an alternative to iTunes

iTunes IconImage via Wikipedia

PowerTunes 1.1.3 Music and Audio Software Review


Source: macworld.com
By Dan Frakes, Macworld.com - October 19, 2010

A few years back, I covered iPhoto Library Manager, a great utility that lets you easily manage - and even transfer photos and albums between - multiple iPhoto Libraries.
For many of the same reasons you might want more than one iPhoto Library - keeping the size of each reasonable for better performance, or keeping work and personal stuff separate, for example - some iTunes users keep multiple media libraries.
iTunes provides rudimentary support for multiple media libraries: If you hold down the option key at launch, iTunes will ask you which library to use (or let you create a new one).
But that's the extent of the built-in capabilities - if you want to move a playlist from one library to another, for example, you must do so manually, and you'll lose custom metadata in the process.
A better alternative is to use PowerTunes, the iTunes-focused sibling of iPhoto Library Manager.
From within the PowerTunes window, you can create as many new iTunes libraries - or add as many existing libraries - as you like, each with its own media and settings.
When creating a new library, you choose where to store the library folder and files, as well as where to store the library's actual media - in a new media folder, in the same media folder as one of your other libraries, in another (non-iTunes) media folder, or in a "shared" media folder (more on that in a bit).
A library's media folder can be on your startup drive, on another connected drive, or even on a network drive.
Once you've got multiple libraries set up, PowerTunes offers a number of simple ways to switch between them.
Whichever method you use to choose a library, PowerTunes then quits iTunes and relaunches it with the chosen library active.
For example, the utility makes it easy to copy playlists from one library to another, bringing along play counts, ratings, EQ presets, and other metadata.
(The only metadata that isn't retained for each track is the Date Added field.)
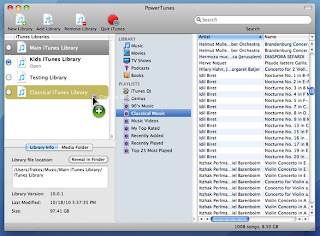
You simply select the source library (the one in which the playlist currently resides) to view its playlists, and then drag the desired playlist to the destination library (the one to which you want to copy the playlist).
PowerTunes spends some time getting information about the tracks in the playlist - for a playlist of just over 1,000 tracks, this took about five minutes on a 2010 Mac mini - and then begins the copy process.
I found this feature especially useful when transferring just a subset of my desktop Mac's huge iTunes library onto my MacBook's smaller hard drive.
 Using PowerTunes to copy a playlist from one iTunes library to another

You can copy individual tracks between libraries using the same drag-and-drop procedure - libraries are even spring-loaded, so holding tracks over a library for a second or so displays that library's playlists, letting you copy tracks directly to a particular playlist.
PowerTunes also provides an iTunes-like search field for locating tracks - this feature is especially useful because it lets you search the libraries that aren't currently open in iTunes.
You can also duplicate an existing library if, say, you want to use an existing library as a starting point for a new library.
(This option doesn't duplicate your media - the new and existing libraries share the same media folder.)
PowerTunes also provides a number of sought-after features for managing libraries and the media within them.
For example, the program makes it simple to move your media to a different location, or even to a different drive, and you can also merge two libraries into a single library.
The latter feature is useful if, say, you and your spouse have been maintaining separate libraries and you decide you want to put everything together - the advantage to using PowerTunes over manually importing media from one library to another is, again, that PowerTunes maintains metadata.
(One limitation here is that, because of a limitation in iTunes, PowerTunes can't transfer podcasts from one library to another. The developer provides instructions for transferring podcasts manually.)
If you've ever seen the dreaded exclamation-point icon next to a track in iTunes, you know it means that iTunes can't find that track.
PowerTunes includes a Fix Dead Tracks command that displays a list of every "dead" track in the selected iTunes library.
Select one, and PowerTunes displays a list of possible matches on your hard drive, compiled via a Spotlight search.
If the correct media file is listed, just select it and click Fix Track.
If an entire album is dead, the Fix Multiple Tracks command lets you choose all of the album's tracks and fix them all at once.
This feature worked well in my testing, although it still requires you to go through the list of dead tracks one at a time (or at least one album's worth at a time).
The other drawback to this feature is that, because of the way iTunes checks for dead tracks, after each fix PowerTunes must quit iTunes and relaunch it - a procedure that can get tiresome if you're fixing many tracks.
This feature scans the selected media folder and looks for such "orphans," displaying them in a list.
You can then select individual tracks or albums and choose to either add them to your library or move them to the Trash.
PowerTunes also includes two ways to share iTunes libraries between multiple user accounts.
The first configures a library's media folder, using ACLs, so multiple users can access that folder.
The second also shares the library folder itself, so that multiple people can use the same playlists, ratings, and the like.
(If you opt for the latter approach, be sure not to have iTunes running in more than one account at the same time.)
If you're the type to be concerned about a utility performing these kinds of tweaks to your iTunes library, you'll appreciate that PowerTunes maintains detailed logs of each action it performs.
My only major complaint about PowerTunes is performance: If you make changes to a library from within iTunes - for instance, if you create a new playlist - it can take 20 or 30 seconds before those changes are reflected within PowerTunes.
Similarly, there's often a delay between selecting a library in PowerTunes and seeing its contents, even if you aren't actually switching to that library.
Nevertheless, PowerTunes is a welcome bit of help for those of us with multiple iTunes libraries, and its management features even make it useful for those with a single, large library.
Want to stay up to date with the latest Gems?
Sign up for the Mac Gems newsletter for a weekly e-mail summary of Gems reviews sent directly to your Inbox.
You can also follow Mac Gems on Twitter.
Sorry, the product you requested isn't currently available from any of our sellers.
We recommend these Music and Audio for their similarities to the PowerTunes 1.1.3 in features, specs, ratings, and user interest.
PowerTunes is an easy-to-use utility for managing one or more iTunes libraries.
It's also a handy tool for cleaning up those libraries.
GarageBand '11 is a worthwhile evolutionary update that brings musicians more guitar and keyboard lessons, guitar amps and effects, and fixes for poor timing.
Reason 5 is a must-have upgrade for anyone who uses audio inputs or samples, or wants to program beats.
For those who haven't used Reason for a while, Kong is worth a second look.
Record 1.5 shows Propellerhead is committed to its new mixing and arrangement workstation.
It's also pretty easy to recommend in a bundle with Record 5, which includes fantastic new sampling features and a drum designer.
On its own, it's a tougher sell.

Enhanced by Zemanta

Thursday, October 28, 2010

Mac OS X 10.7 Lion bringing iOS features to Mac in summer 2011

Mac OS X 10.7 Lion bringing iOS features to Mac in summer 2011


Source: www.appleinsider.com


Inspired by innovations in the iPhone and iPad, the next version of Mac OS X, dubbed "Lion," will bring iOS features to the Mac platform, including multi-touch gestures, the App Store and Home screens, coming Summer 2011.


Apps resume when launched Apple said Lion, shipping next summer, is inspired by many of iPad's software innovations.

Today's sneak peek highlighted just a few of Lion's features, including the Mac App Store, a new way to discover, install and automatically update desktop apps; Launchpad, a new home for all of your Mac apps; system-wide support for full screen apps; and Mission Control, which unifies Exposé, Dashboard, Spaces and full screen apps into an innovative new view of everything running on your Mac, and allows you to instantly navigate anywhere.

"Lion brings many of the best ideas from iPad back to the Mac, plus some fresh new ones like Mission Control that Mac users will really like," Jobs said in a press release.

"Lion has a ton of new features, and we hope the few we had time to preview today will give users a good idea of where we are headed."

Multi-Touch

Jobs said that touchscreens don't work when in front of a user, which is why devices like the iPhone and iPad are successful.
 

Given that, Jobs said Macs will stick with products like the trackpad and Magic Mouse for input.

"This is how we're going to use multi-touch on our Mac products," he said.

Mac App Store

Lion will bring the Mac App Store, which, like on iOS, will include one-click downloads, free and paid downloads, and revenue sharing with developers.

The Mac App Store will also include automatic updates, and software will be licensed for use on all personal Macs.

Apple said the Mac App Store brings the App Store experience to OS X, making discovering, installing and updating Mac apps easier than ever.

Like on iPad, you purchase apps using your iTunes account and they download and install in just one step.

App updates are delivered directly through the Mac App Store, so it's easy to keep all of your apps up to date.

The Mac App Store will be available for Snow Leopard within 90 days and will be included in Lion when it ships next summer.

A demo showing off the Mac App Store showed off the ability to purchase and install Pages with just one click.

Applications can also be added to the Launch Pad, which can be selected from the Mac OS X Dock and brings an iPad-style grid of icons and pages onto the screen as an overlay.

Mission Control

Jobs also announced a new feature, Mission Control, which allows users to view anything running on a Mac and instantly navigate to anywhere.

He said this will combine existing features, like Expose, with new ones like full screen.


Apple said that Mission Control presents you with a unified view of every app and window running on your Mac, so you can instantly navigate anywhere.

Mission Control also incorporates the next generation of Exposé, presenting all the windows running on your Mac grouped by application, alongside thumbnails of full screen apps, Dashboard and other Spaces.

Mission Control clusters alike apps, making them easy to select when in Mission Control.

Launchpad

Launchpad makes it easier than ever to find and launch any app.

Similar to the Home screen on iPad, you can see all the apps on your Mac elegantly displayed just by clicking the Launchpad icon in the dock.

Apps can be organized in any order or grouped into folders, and you can swipe through multiple pages of apps to find the one you want.

Lion includes system-wide support for full screen applications.

With Lion, you can enter full screen mode with just one click, switch from one full screen app to another with just a swipe of the trackpad, and swipe back to the desktop to access your multi-window applications.

"I wish we had another hour and a half to show you more," Jobs said at the conclusion of Wednesday's presentation.

"We'll unveil this over time as we get closer to releasing it."

Related


Enhanced by Zemanta

Thursday, October 21, 2010

How to Accomplish Your Real Goals

The Human Condition, 1935Image via Wikipedia
Source: Get-It-Done Guy :: Quick and Dirty Tips

How to Accomplish Your Real Goals

Bernice is simply demonstrating the human condition. We set goals, make a plan to reach our goals, and then forget the goals. We get so engrossed in the plan that it becomes our be-all-and-end-all, even if it’s not getting us to the goal we want. Bernice decided that the way to be on time was to appease the Goddess. She got so wrapped up in her ritual that she didn’t realize the ritual itself was getting in her way!
We can make our lives run smoothly by aligning our actions around our real goals.
“That silly Bernice!” we all think. “Fortunately, I would never do something that foolish.” Ya think? Substitute “finish the current project” for “go camping” and “attend weekly status meeting” for “appeasing the Goddess.”
We can make our lives run as smoothly as melted Velveeta™ by aligning our actions around our real goals. This is covered in detail in my book, in Chapter 1: Living on Purpose. Here’s a quick overview of the basic process.

Reconnect With Your Goal by Asking Why

First, discover why you’re doing what you do. Take out your to-do list. For each item, ask, “Why am I doing this?” Write down the answer. Then ask, “Why am I doing that?” You’ll work your way up your ladder of goals until you reach a top level goal that’s a major business or life goal.
Enhanced by Zemanta

Tuesday, October 12, 2010

How to password protect folders


Source: Macworld


Summary:

Is there a way to password protect a folder that holds Word or Excel files?


You can password protect any folder by turning that folder into an encrypted disk image.

Create your folder full of documents and launch Disk Utility (/Applications/Utilities).

Choose File -> New -> New Disk Image From Folder.

In the Select Folder to Image window that appears navigate to the folder you've created.

Select it and click the Image button.

In the resulting window select Read/Write from the Image Format pop-up menu and 128-bit AES Encryption (Recommended) from the Encryption pop-up menu.

(If you're very concerned about security you can choose 256-bit AES Encryption, but as the parenthetical advises, this is more secure but takes longer to encrypt.)

If you're concerned about the amount of space the image might consume, you can choose Compressed from the Image Format pop-up menu, but the image will take a little longer to create.

Click Save and Disk Utility will prompt you to enter and verify a password.

You'll also see the Remember Password in My Keychain option.

If you don't and someone sits down at your computer when it's logged into your account, they can open the image simply by double-clicking on it.

Click OK and Disk Utility will create the encrypted image.

You now have both the encrypted image and the unprotected folder.

Keeping the original unprotected folder at hand isn't such a hot idea as it's accessible to anyone who uses your Mac when it's logged into your account, so trash it or archive it somewhere safe.

To access the contents of the encrypted image, double-click it, enter the password you assigned, and wait while the image mounts.

When you've finished with it, drag the mounted image (not the encrypted disk image) to the trash.

That's all well and good if you don't intend to add a lot more files to this folder, as it won't grow to accommodate those new files.

If you need an encrypted container that can accommodate more files, consider creating an encrypted sparse image.

Sparse images are images of a user-determined size that consume only as much storage as is used by the content in the image.

So, for example, you can create a sparse image that will hold up to 5GB of data.

If you put only 1GB of data in it and check its file size, you will see that it's approximately 1GB in size.

But you have the option to add another 4GB of data to it.

Return to Disk Utility and choose File -> New -> Blank Disk Image.

In the New Blank Image window that appears, choose Sparse Disk Image from the Image Format pop-up menu.

From the Size pop-up menu pick a size that appeals to you or choose Custom and, in the sheet that appears, enter the size you like.

From the Encryption pop-up menu choose 128-bit AES Encryption (or the sterner but slower 256-bit encryption).

As before, you're prompted for a password.

Also as before, you should uncheck the Remember Password in My Keychain option.

Click OK and both the sparse image file and mounted image are created.

Drag the content that you want to protect into the mounted image.

When you're done with it, drag the mounted image to the trash.

When you next need it, double-click on the sparse image file and enter its password when prompted.